Developer Guide
- Table of Contents:
- Acknowledgements
- Setting Up, getting started
- Design
- Implementation
- Documentation, testing, configurations, dev-ops
- Appendix:
- Product scope
- User stories
- Use cases
- Planned Enhancements
- Non-functional Requirements
- Glossary
- Instructions for manual testing
Acknowledgements
-
NomNomNotifier is adapted from the AddressBook Level-3 created by the SE-EDU initiative.
-
Below are the Java libraries used in this project:
- JavaFX for UI
- JUnit5 and TestFX for Testing
- Jackson for Storage
Setting up, getting started
Refer to the guide Setting up and getting started.
Design
.puml files used to create diagrams in this document docs/diagrams folder. Refer to the PlantUML Tutorial at se-edu/guides to learn how to create and edit diagrams.
Architecture
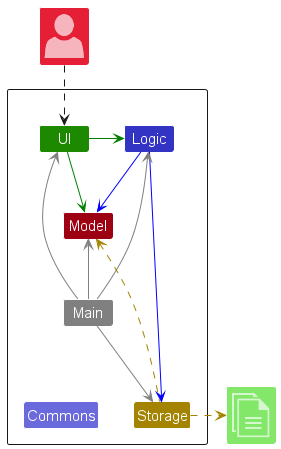
The Architecture Diagram given above explains the high-level design of the App.
Given below is a quick overview of main components and how they interact with each other.
Main components of the architecture
Main (consisting of classes Main and MainApp) is in charge of the app launch and shut down.
- At app launch, it initializes the other components in the correct sequence, and connects them up with each other.
- At shut down, it shuts down the other components and invokes cleanup methods where necessary.
The bulk of the app’s work is done by the following four components:
-
UI: The UI of the App. -
Logic: The command executor. -
Model: Holds the data of the App in memory. -
Storage: Reads data from, and writes data to, the hard disk.
Commons represents a collection of classes used by multiple other components.
How the architecture components interact with each other
The Sequence Diagram below shows how the components interact with each other for the scenario where the user issues the command delete 1.
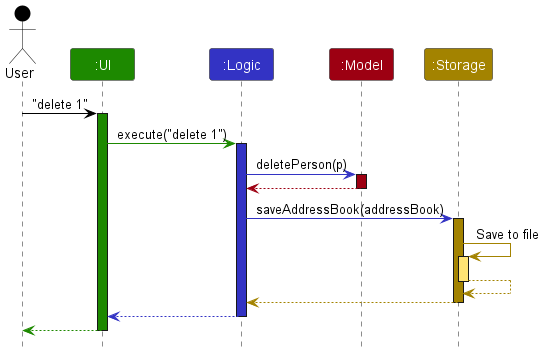
Each of the four main components (also shown in the diagram above),
- defines its API in an
interfacewith the same name as the Component. - implements its functionality using a concrete
{Component Name}Managerclass (which follows the corresponding APIinterfacementioned in the previous point.
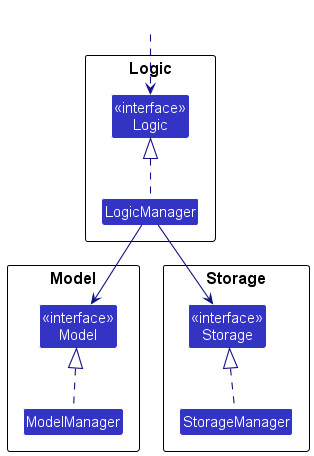
For example, the Logic component defines its API in the Logic.java interface and implements its functionality using the LogicManager.java class which follows the Logic interface. Other components interact with a given component through its interface rather than the concrete class (reason: to prevent outside component’s being coupled to the implementation of a component), as illustrated in the (partial) class diagram below.
The sections below give more details of each component.
UI component
The API of this component is specified in Ui.java
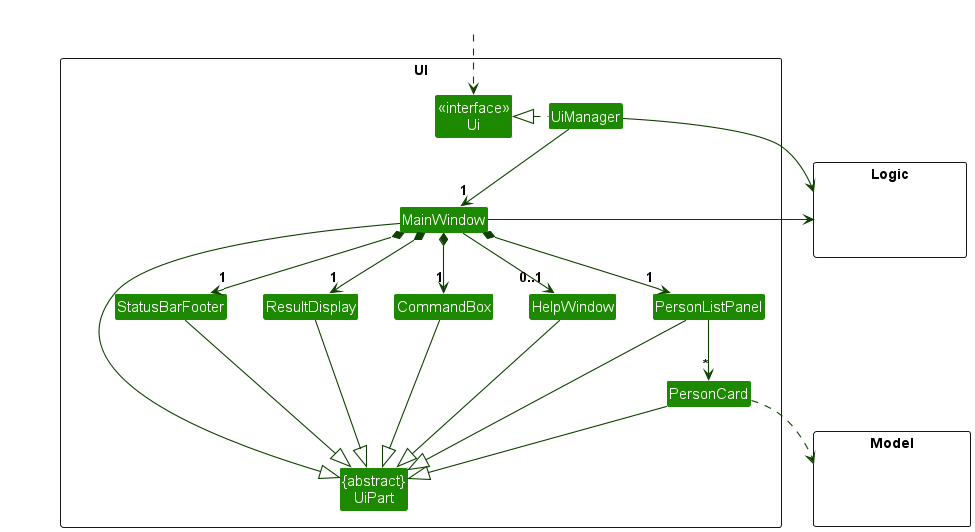
The UI consists of a MainWindow that is made up of parts e.g.CommandBox, ResultDisplay, PersonListPanel etc. All these, including the MainWindow, inherit from the abstract UiPart class which captures the commonalities between classes that represent parts of the visible GUI.
The UI component uses the JavaFx UI framework. The layout of these UI parts are defined in matching .fxml files that are in the src/main/resources/view folder. For example, the layout of the MainWindow is specified in MainWindow.fxml
The UI component,
- executes user commands using the
Logiccomponent. - listens for changes to
Modeldata so that the UI can be updated with the modified data. - keeps a reference to the
Logiccomponent, because theUIrelies on theLogicto execute commands. - depends on some classes in the
Modelcomponent, as it displaysPersonobject residing in theModel.
Logic component
API : Logic.java
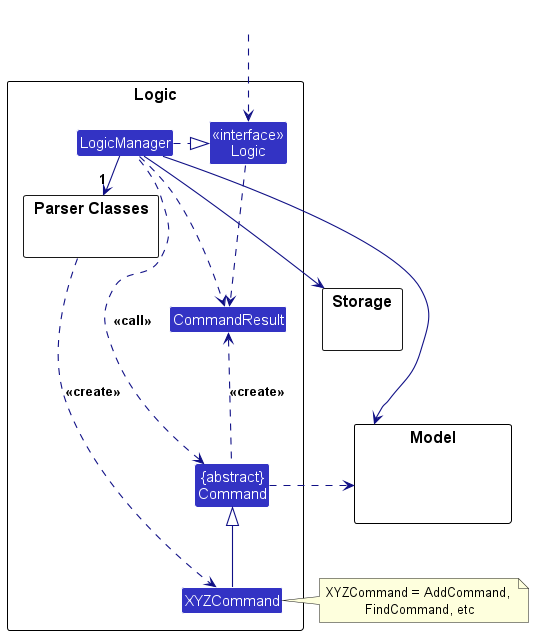
Here’s a (partial) class diagram of the Logic component:
The sequence diagram below illustrates the interactions within the Logic component, taking execute("delete 1") API call as an example.
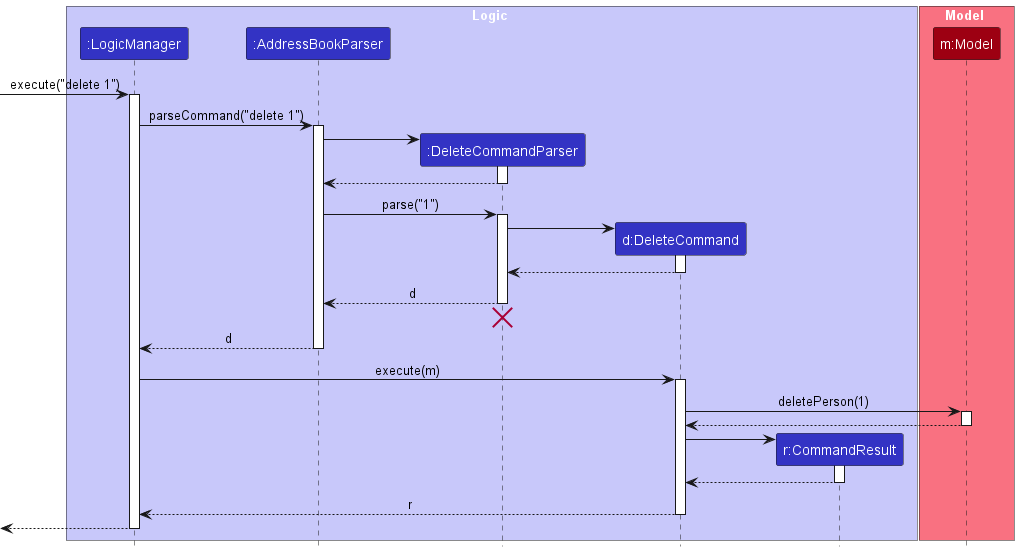
DeleteCommandParser should end at the destroy marker (X) but due to a limitation of PlantUML, the lifeline continues till the end of diagram.
How the Logic component works:
- When
Logicis called upon to execute a command, it is passed to anAddressBookParserobject which in turn creates a parser that matches the command (e.g.,DeleteCommandParser) and uses it to parse the command. - This results in a
Commandobject (more precisely, an object of one of its subclasses e.g.,DeleteCommand) which is executed by theLogicManager. - The command can communicate with the
Modelwhen it is executed (e.g. to delete a person).
Note that although this is shown as a single step in the diagram above (for simplicity), in the code it can take several interactions (between the command object and theModel) to achieve. - The result of the command execution is encapsulated as a
CommandResultobject which is returned back fromLogic.
Here are the other classes in Logic (omitted from the class diagram above) that are used for parsing a user command:
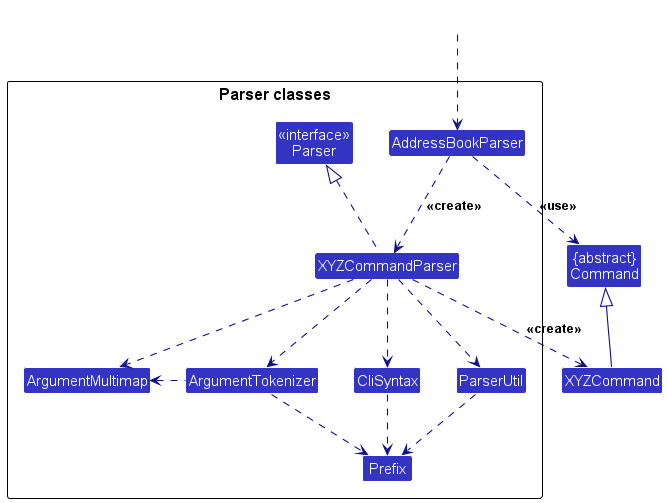
How the parsing works:
- When called upon to parse a user command, the
AddressBookParserclass creates anXYZCommandParser(XYZis a placeholder for the specific command name e.g.,AddCommandParser) which uses the other classes shown above to parse the user command and create aXYZCommandobject (e.g.,AddCommand) which theAddressBookParserreturns back as aCommandobject. - All
XYZCommandParserclasses (e.g.,AddCommandParser,DeleteCommandParser, …) inherit from theParserinterface so that they can be treated similarly where possible e.g, during testing.
Model component
API : Model.java

The Model component,
- stores address book data, including:
- all
Personobjects (which are contained in aUniquePersonListobject). - A list of shortcuts, represented by
UniqueShortCutList, which containsShortCutobjects. EachShortCutmaps an alias (represented byAlias) to a full tag name (represented byFullTagName).
- all
- stores the currently ‘selected’
Personobjects (e.g., results of a search query) as a separate filtered list which is exposed to outsiders as an unmodifiableObservableList<Person>that can be ‘observed’ e.g. the UI can be bound to this list so that the UI automatically updates when the data in the list change. - stores a
UserPrefobject that represents the user’s preferences. This is exposed to the outside as aReadOnlyUserPrefobjects. - does not depend on any of the other three components (as the
Modelrepresents data entities of the domain, they should make sense on their own without depending on other components)
Person Model Components
-
Person: Represents a single individual in the address book, encapsulating multiple details about the person.
-
Name: Represents the name of the person. Enforces validation rules to ensure data integrity. -
Phone: Represents the phone number of the person. It includes validation to ensure that the data matches a specific format. -
Email: Represents the email address of the person, with validation for standard email formats. -
Address: Represents the residential or business address of the person. -
PostalCode: Part of theAddressclass, further specifying the person’s address. -
Tag: A list of tags associated with the person, allowing categorization of people (e.g., “friend”, “colleague”). -
OrderTracker: Keeps track of the orders associated with the person.
-
Order Model Components
- Order: Represents a single order that is stored in the UniqueOrderList
- OrderHistory: Represents a single order that is that placed at a particular time
-
OrderTracker: Represents a list of
OrderHistory, this class is used to track the order of a customer/person -
UniqueOrderList: Manages the collection of all
Orderobjects within theAddressBook. EachOrderin the list is unique by its name.
Shortcut Model Components
The shortcut functionality has been added to enhance the tagging process within the AddressBook. It includes the following components:
-
UniqueShortCutList: Manages the collection of allShortCutobjects within theAddressBook. Each shortcut in the list is unique by alias. -
ShortCut: Represents a mapping between an alias (shortcut) and a full tag name. -
Alias: A class representing the alias of a tag, enforcing specific validation rules. -
FullTagName: A class representing the full name of the tag associated with an alias, also enforcing validation rules.
Tag list in the AddressBook, which Person references. This allows AddressBook to only require one Tag object per unique tag, instead of each Person needing their own Tag objects.Storage Component
API : Storage.java
The Storage component is responsible for managing data persistence, including saving and loading both the address book data and user preference settings. It stores data in JSON format and reads them back into corresponding objects.
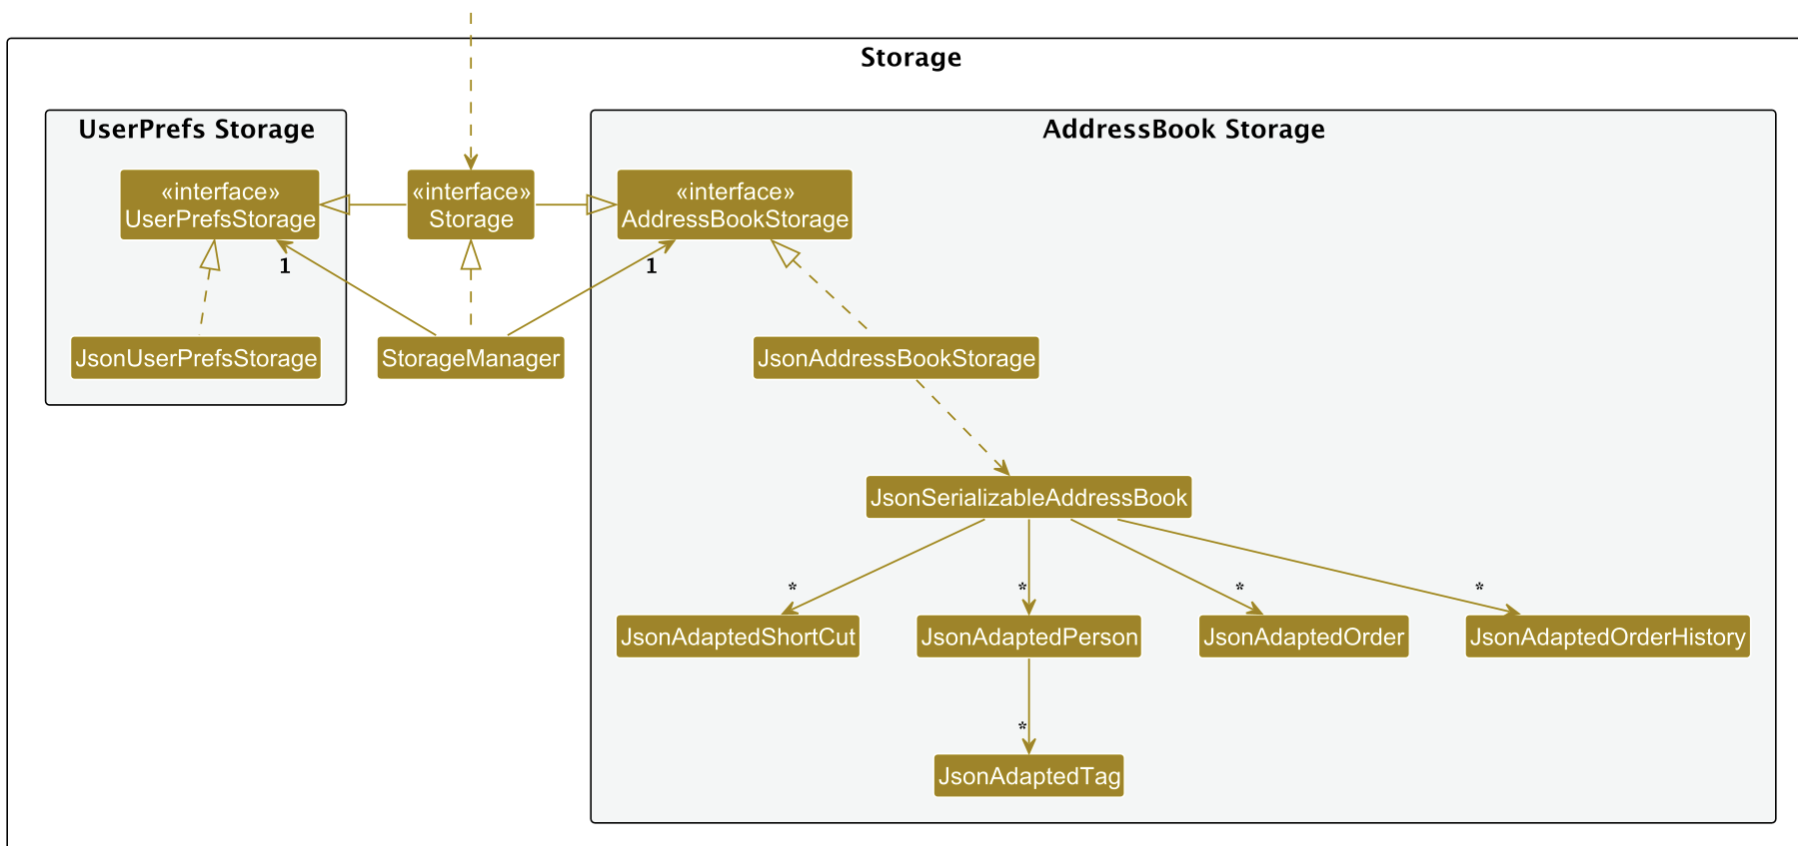
Structure
The Storage component consists of the following main packages:
- User Preferences Storage
- Address Book Storage
Each of these storage packages provides interfaces and implementations for reading and writing data in a structured way. The StorageManager serves as the central manager for handling both user preferences and address book data storage.
Key Classes and Interfaces
-
Storage(interface):- The primary interface for storage functionality, extending both
AddressBookStorageandUserPrefsStorage. - This design allows
Storageto be used as either an address book storage handler or a user preferences storage handler, depending on the context.
- The primary interface for storage functionality, extending both
-
StorageManager(class):- Implements the
Storageinterface, consolidating bothAddressBookStorageandUserPrefsStoragefunctionality. - Manages both types of storage using their respective implementations (
JsonAddressBookStoragefor address book data andJsonUserPrefsStoragefor user preferences).
- Implements the
-
UserPrefsStorage(interface):- Provides methods for reading and writing user preferences data.
- Implemented by
JsonUserPrefsStorage, which reads/writes user preferences in JSON format.
-
AddressBookStorage(interface):- Defines methods for reading and writing the address book data.
- Implemented by
JsonAddressBookStorage, which handles JSON storage forAddressBook.
JSON-Based Storage for Address Book Data
The Address Book data storage relies on JSON serialization with the following classes:
-
JsonAddressBookStorage(class):- Implements
AddressBookStorageand manages the reading/writing of JSON data for the address book.
- Implements
-
JsonSerializableAddressBook(class):- Provides the schema for serializing the
AddressBookdata, includingPersonandShortcutobjects.
- Provides the schema for serializing the
-
JsonAdaptedShortCut,JsonAdaptedPerson,JsonAdaptedOrder,JsonAdaptedOrderHistoryandJsonAdaptedTag(classes):- Adapter classes for each entity within the
AddressBook. - These classes are responsible for converting each respective model component into a format suitable for JSON serialization and deserialization.
- Adapter classes for each entity within the
Common classes
Classes used by multiple components are in the seedu.address.commons package.
Implementation
This section describes some noteworthy details on how certain features are implemented.
Add Shortcut feature
Implementation
The addShortCut feature enables users to create shortcuts for tags in the address book. This process includes parsing the command input, checking for existing aliases or tag names in Model to avoid duplication, and adding the shortcut in UniqueShortCutList in Model.
Given below is an example usage scenario and how the add shortcut mechanism works at each step.
Step 1: Command Execution by LogicManager:
- The
LogicManagerreceives theexecute("addShortCut al/v tn/Vegan")command. This initiates the process of adding a shortcut whereal/vrepresents the alias (v), andtn/Veganrepresents the full tag name (Vegan).
Step 2: Parsing the Command:
-
LogicManagercallsparseCommandonAddressBookParserwith the command string to interpret the input. -
AddressBookParsercreates anAddShortCutCommandParserto handle the specifics of parsing theaddShortCutcommand.
Step 3: Tokenizing and Parsing Arguments:
- The
AddShortCutCommandParsertokenizes the command arguments (al/v tn/Vegan) to identify the alias and full tag name. - It uses
ArgumentTokenizerto break down the input andParserUtilto validate and extract the alias (v) and tag name (Vegan).
Step 4: Creating AddShortCutCommand:
- With the parsed alias and tag name,
AddShortCutCommandParsercreates a newAddShortCutCommandinstance with these values and returns it toAddressBookParser, which then passes it back toLogicManager.
Step 5: Executing AddShortCutCommand:
-
LogicManagercalls theexecutemethod ofAddShortCutCommand, passing in theModelinstance (m) to access and update the data.
Step 6: Checking for Existing Aliases and Tag Names:
- The
AddShortCutCommandperforms checks in theModel:-
Alias Check: It calls
Model.hasAlias("v")to see if the alias already exists. If it does, the command throws aCommandExceptionwith the message"Alias already exists", and the process stops. -
Tag Name Check: If the alias is unique,
AddShortCutCommandproceeds to check if the tag name (Vegan) already exists inModelusingModel.hasTagName("Vegan"). If the tag name exists, aCommandExceptionis thrown with the message"Tag name already exists".
-
Alias Check: It calls
Step 7: Adding the New Shortcut:
- If both checks pass (i.e., the alias and tag name are unique),
AddShortCutCommandcallsModel.addShortCut(toAdd)to add the new shortcut to theModel. - Following this, it calls
Tag.updateShortCutMappings(m)to update the shortcut mappings in theTagcomponent, ensuring the new shortcut is recognized.
Step 8: Returning the Result:
- After successfully adding the shortcut,
AddShortCutCommandcreates aCommandResultwith a success message, such as"New Shortcut added: v -> Vegan". - The result is returned back to
LogicManager, completing theaddShortCutcommand execution.
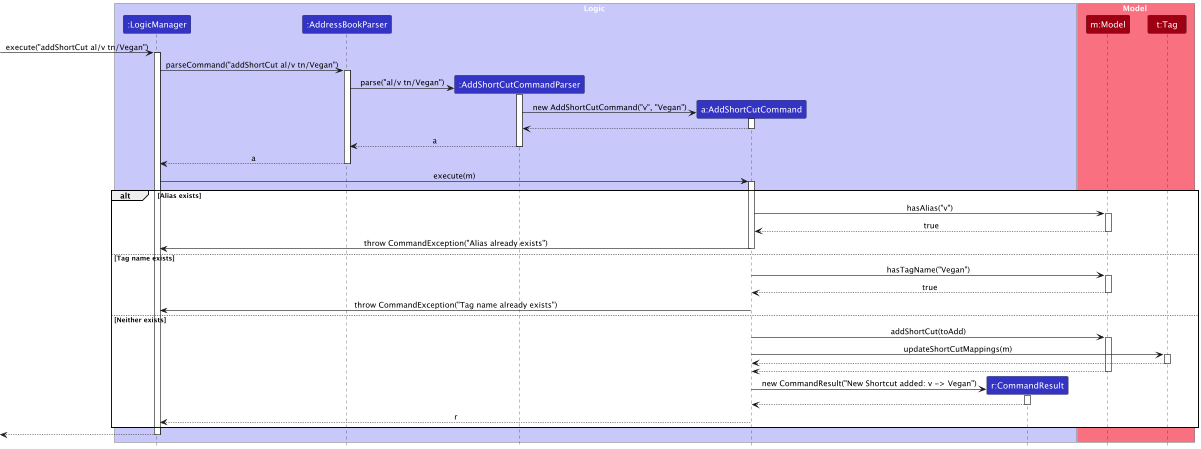
Figure: Add Shortcut Sequence Diagram
Delete Shortcut feature
Implementation
The delShortCut feature allows users to delete existing shortcuts for tags in the address book. This process involves parsing the command input, checking if the specified shortcut exists in Model, and removing it if it does. If the shortcut does not exist, an error message is returned.
Below is a step-by-step usage scenario of the delShortCut feature, illustrating how each component interacts in the deletion process.
Step 1: Command Execution by LogicManager:
- The
LogicManagerreceives theexecute("delShortCut al/v tn/Vegan")command. This starts the deletion process for the shortcut whereal/vrepresents the alias (v), andtn/Veganrepresents the full tag name (Vegan).
Step 2: Parsing the Command:
-
LogicManagercallsparseCommandonAddressBookParserwith the command string to interpret the input. -
AddressBookParsercreates aDelShortCutCommandParserto handle the specifics of parsing thedelShortCutcommand.
Step 3: Tokenizing and Parsing Arguments:
-
DelShortCutCommandParsertokenizes the command arguments (al/v tn/Vegan) to extract the alias and full tag name. - It uses
ArgumentTokenizerto break down the input andParserUtilto parse and validate the alias (v) and tag name (Vegan).
Step 4: Creating DelShortCutCommand:
- With the parsed alias and tag name,
DelShortCutCommandParsercreates a newDelShortCutCommandinstance with these values and returns it toAddressBookParser, which then passes it back toLogicManager.
Step 5: Executing DelShortCutCommand:
-
LogicManagercalls theexecutemethod ofDelShortCutCommand, passing in theModelinstance (m) to access and update data.
Step 6: Checking for the Shortcut’s Existence:
- Inside
execute,DelShortCutCommandfirst checks if the shortcut exists by callingModel.hasShortCut(toRemove):-
Shortcut Exists: If
hasShortCutreturnstrue, the command proceeds to delete the shortcut. -
Shortcut Does Not Exist: If
hasShortCutreturnsfalse, aCommandExceptionis thrown with the message"Shortcut not found", and the process stops.
-
Shortcut Exists: If
Step 7: Deleting the Shortcut and Updating Mappings:
- If the shortcut exists,
DelShortCutCommandcallsModel.removeShortCut(toRemove)to remove the shortcut fromModel. - It then calls
Tag.updateShortCutMappings(m)to ensure theTagcomponent reflects the updated shortcuts.
Step 8: Returning the Result:
- After successfully deleting the shortcut,
DelShortCutCommandcreates aCommandResultwith the success message"Shortcut Deleted: v". - The result is returned to
LogicManager, completing thedelShortCutcommand execution.
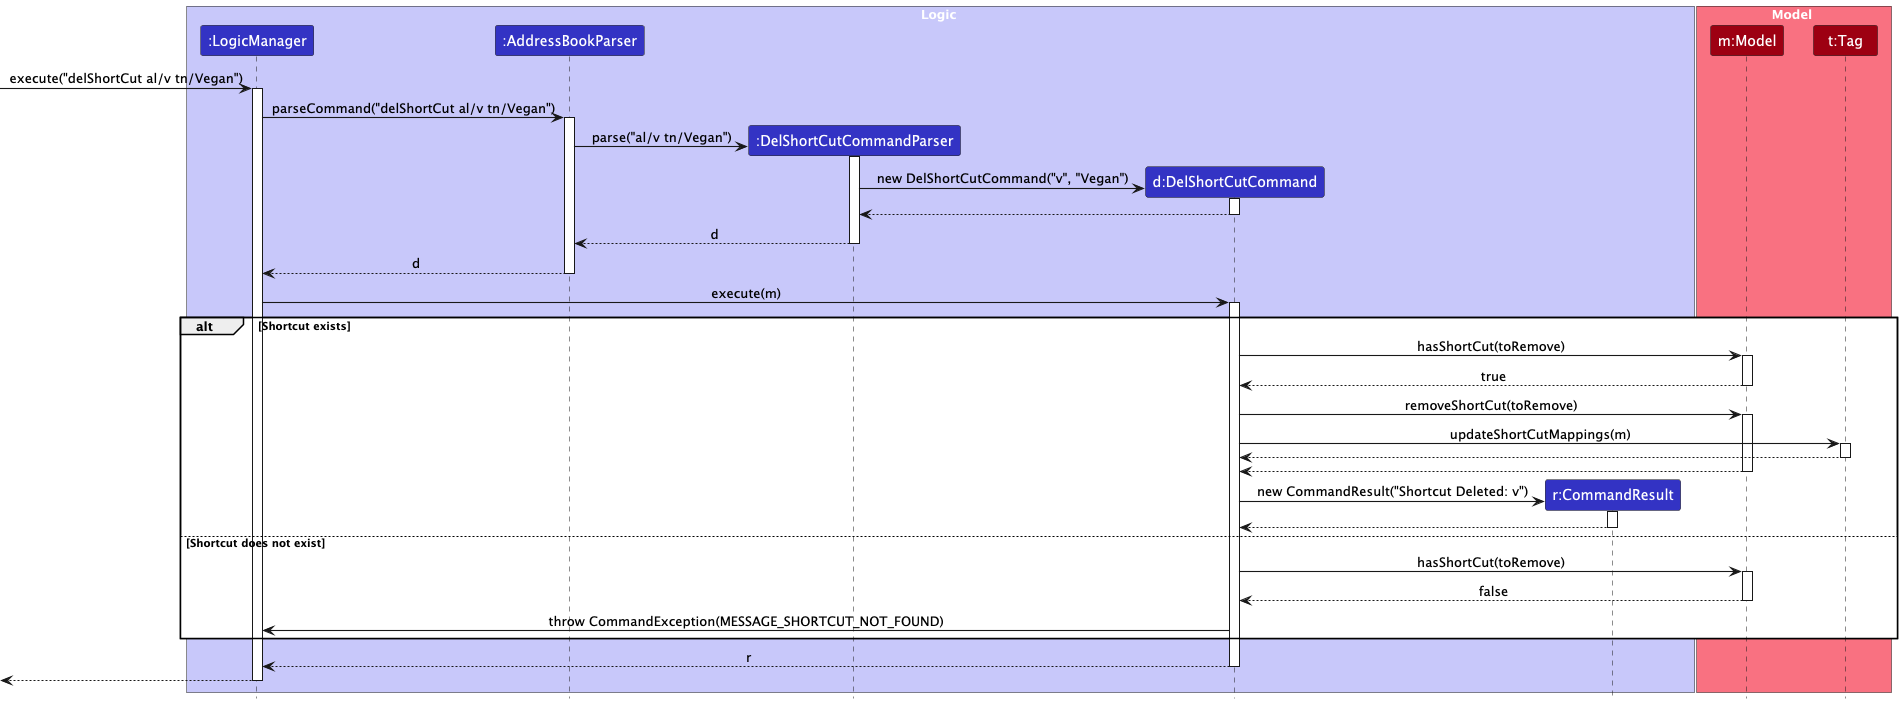
Figure: Delete Shortcut Sequence Diagram
Additional Info
- This implementation ensures users can delete shortcuts with feedback on success or failure. If the shortcut does not exist, the system provides a clear error message, and
Tag.updateShortCutMappingsensures shortcut mappings remain up-to-date across components. - This implementation allows users to create new shortcuts while enforcing uniqueness. It provides meaningful error feedback if a conflict exists, and updates the model with new shortcuts. The
Tag.updateShortCutMappingsmethod ensures all components are aware of the new mapping, maintaining consistency across the application.
Design Explanation:
When creating a Shortcut, ALIAS and TAG_NAME are case-insensitive: the methods
Model.hasAliasandModel.hasTagNamechecks if the value exist in storage regardless of how it is captialised. This was done to avoid confusion between different aliases set. eg. “V” and “v”. We still wanted to enforce case-sensitivity for commands witht/when creating custom tags to offer flexibility to the user
Add an Order to customer using put
Implementation
The put command enables users to add an order for a specified contact in the address book. This process includes parsing the command input to retrieve the order and contact name, checking in Model if the order and person exist, and, if valid, adding the order to the contact’s record.
Below is an example usage scenario and how the put command mechanism works at each step.
-
Execution Begins
The
LogicManagerreceives the"put cake n/Alex"command and calls itsexecutemethod. -
Command Parsing
-
LogicManagersends aparseCommand("put cake n/Alex")request toAddressBookParserto interpret the command. -
AddressBookParsercreates a new instance ofPutOrderCommandParserand forwards the request to it by callingparse("cake n/Alex").
-
-
Command Creation
-
PutOrderCommandParsercreates anew PutOrderCommandobject with the order “cake” and person “Alex” as parameters.
-
-
Order Existence Check
-
PutOrderCommandsends ahasOrder(order)request toModelto check if the order “cake” exists. -
Modelreturns true if the order exists (indicating that “cake” is a valid order) and the command proceeds to the next step. - If the order does not exist,
Modelreturns false, andPutOrderCommandthrows aCommandExceptionwith the messageMESSAGE_ORDER_NOT_FOUNDback toLogicManager, ending the execution.
-
-
Person Existence Check (if the order exists)
-
PutOrderCommandcallsfindPersonByName(Name)onModelto search for a person with the name “Alex”. - If “Alex” exists in
Model,Modelreturns thePersonobject representing “Alex”. - If “Alex” does not exist,
Modelreturns null, andPutOrderCommandthrows aCommandExceptionwith the messageMESSAGE_PERSON_NOT_FOUNDback toLogicManager, ending the execution.
-
-
Order Placement (if both the order and person exist)
-
PutOrderCommandsends aputOrder(Order)message to thePersonobject to assign the order “cake” to “Alex”. - After successfully placing the order,
PutOrderCommandreturns aCommandResultwith the success messageMESSAGE_SUCCESSback toLogicManager.
-
-
Execution Completion
The command completes its execution, and
LogicManagerprocesses the finalCommandResult.
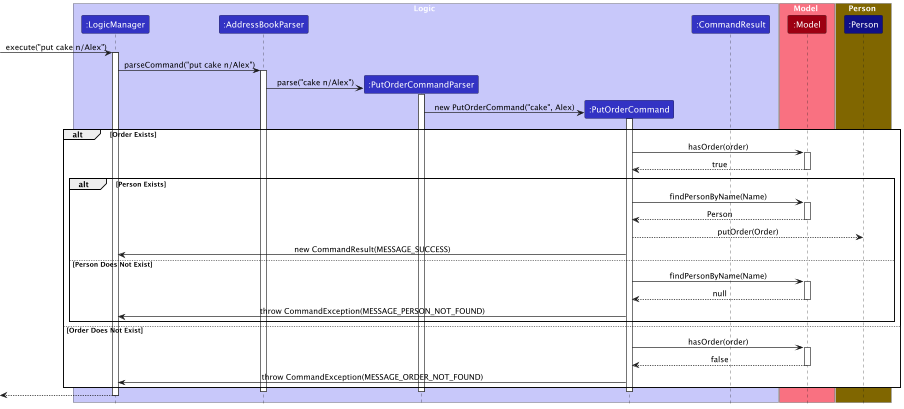
Figure: Put Order Sequence Diagram
Download Command
Implementation
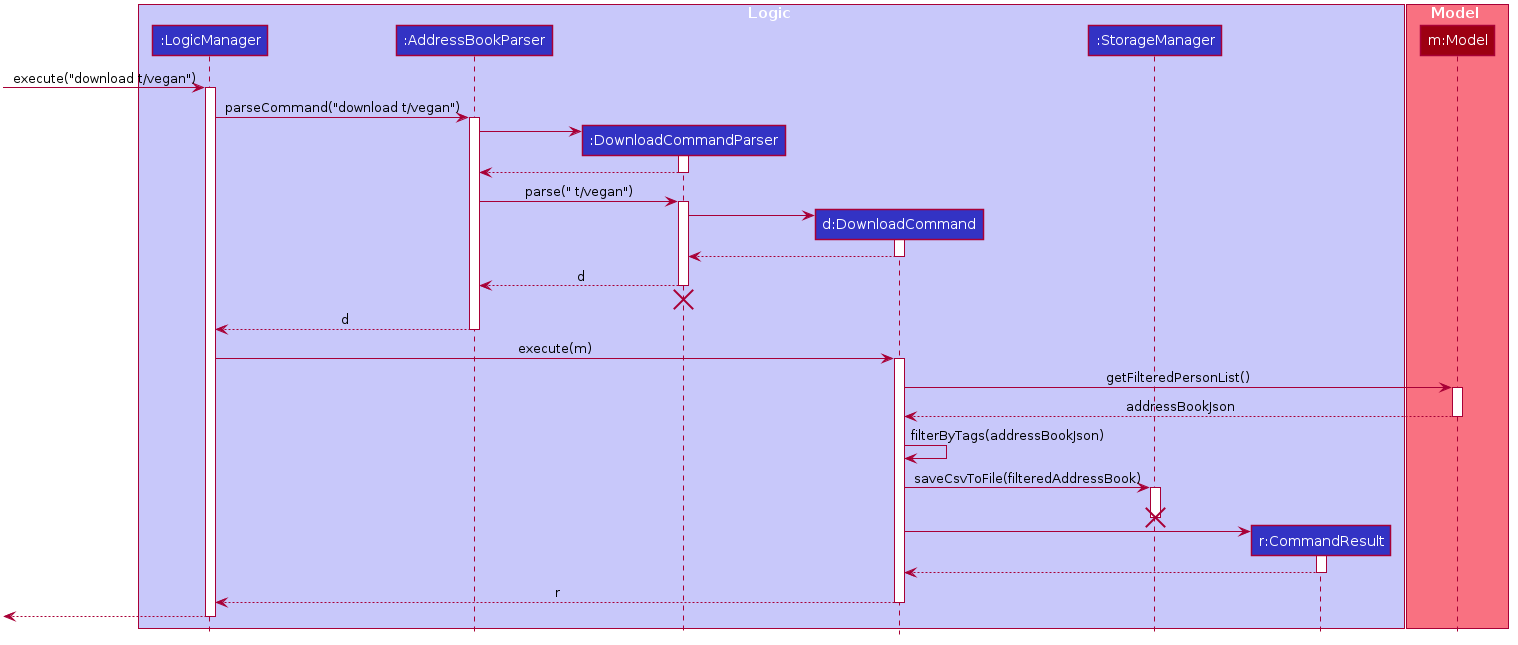
The download command allows users to export the currently displayed customer data in CSV format. Users can also
filter the exported data by specific tags to narrow down the content. The generated CSV file contains customer details such as name, phone, email, postal code, address, and tags.
Usage
download [t/TAG_NAME...]
-
t/TAG_NAME: Optional. Specifies the tags to filter customers. Only customers with the specified tags will be included in the exported file. - If no tags are provided, all customer data will be exported.
Example
- Export all the currently displayed customer data:
downloadExpected Outcome: A CSV file containing all customer data is created in the
./datasubdirectory. - Export data for customers tagged with “VIP”:
download t/VIPExpected Outcome: A CSV file containing only customers tagged with “VIP” is created in the
./datasubdirectory. - Export data for customers with multiple tags:
download t/VIP t/RegularExpected Outcome: A CSV file containing customers tagged with either “VIP” or “Regular” is created.
- Export data with non-matching tags:
download t/NonExistentTagExpected Outcome: An error message is displayed and no file is generated.
Implementation Steps
-
Command Execution:
- The
LogicManagerreceives thedownloadcommand and forwards it toAddressBookParser.
- The
-
Command Parsing:
-
AddressBookParsercreates aDownloadCommandParser, which:- Tokenizes the input to extract the
TAG_NAMEarguments. - Validates the arguments using
ParserUtil. - Creates a new
DownloadCommandwith the extracted tag names.
- Tokenizes the input to extract the
-
-
File Generation:
-
DownloadCommandis executed with access to theModel:- Retrieves the list of customers using
Model#getFilteredPersonList. - Filters the customers based on the provided tags, if any.
-
Empty Result Handling:
- If the filtered list is empty:
- Return an error message.
- Skip the CSV generation process.
- If the list is not empty:
- Converts the customer data to CSV format.
- Writes the CSV data to a file in the
./datasubdirectory.
- If the filtered list is empty:
- Retrieves the list of customers using
-
Sequence Diagram
Below is the sequence diagram for the download command:
Delete by postal code feature
Implementation
The deletePC feature allows users to delete all contacts associated with a specified postal code. This process involves parsing the command input, validating the postal code format, retrieving the list of people matching the postal code from Model, and, if matches are found, deleting each associated contact in Model.
Below is an example usage scenario and how the deletePC mechanism works at each step.
-
Execution Begins:
- The
LogicManagerreceives the"deletePC 540123"command and initiates theexecutemethod.
- The
-
Command Parsing:
-
LogicManagersends theparseCommand("deletePC 540123")request toAddressBookParserto interpret the command. -
AddressBookParsercreates aDeletePostalCodeCommandParserinstance and calls itsparse("deletePC 540123")method.
-
-
Postal Code Validation:
-
DeletePostalCodeCommandParservalidates the format of the postal code"540123". -
If the format is invalid:
DeletePostalCodeCommandParserreturns aParseExceptionwith the message “Invalid format” toLogicManager, and the process terminates. -
If the format is valid:
DeletePostalCodeCommandParserproceeds to the next step.
-
-
Postal Code Creation:
-
DeletePostalCodeCommandParsercreates a newPostalCodeobject with the value"540123". - Once created,
PostalCodereturns itself (c) toDeletePostalCodeCommandParser.
-
-
Command Creation:
-
DeletePostalCodeCommandParsercreates a newDeletePostalCodeCommandobject using thePostalCodeinstancec. -
DeletePostalCodeCommandreturns itself toDeletePostalCodeCommandParser. -
DeletePostalCodeCommandParserthen sendsDeletePostalCodeCommandback toAddressBookParser, completing the parsing.
-
-
Command Execution:
-
AddressBookParserreturnsDeletePostalCodeCommandtoLogicManager. -
LogicManagerthen callsexecute(m)onDeletePostalCodeCommand, passing theModelinstancemas a parameter.
-
-
Finding People by Postal Code:
-
DeletePostalCodeCommandrequestsModelto find all people associated with postal code"540123"by callinggetPeopleByPostalCode(c). -
Modelreturns a list of people (peopleToDelete) associated with"540123".
-
-
Handling Results:
-
If
peopleToDeleteis empty:DeletePostalCodeCommandreturns aCommandExceptionwith the message “No match” toLogicManager, ending the execution. -
If
peopleToDeleteis not empty:DeletePostalCodeCommandproceeds to delete each person in the list.
-
If
-
Deleting People:
- For each
PersoninpeopleToDelete,DeletePostalCodeCommandcallsModel’sdeletePerson(person)to remove the person.
- For each
-
Generating Result:
- After all people are deleted,
DeletePostalCodeCommandcreates aCommandResultwith the message “Deleted customers with postal code 540123: [names]” to indicate the successful deletion. -
CommandResultis returned toDeletePostalCodeCommand, completing the command execution.
- After all people are deleted,
-
Completion:
-
DeletePostalCodeCommandsends the finalCommandResult(r) toLogicManager. -
LogicManagerprocesses the result, concluding the execution of"deletePC 540123".
-
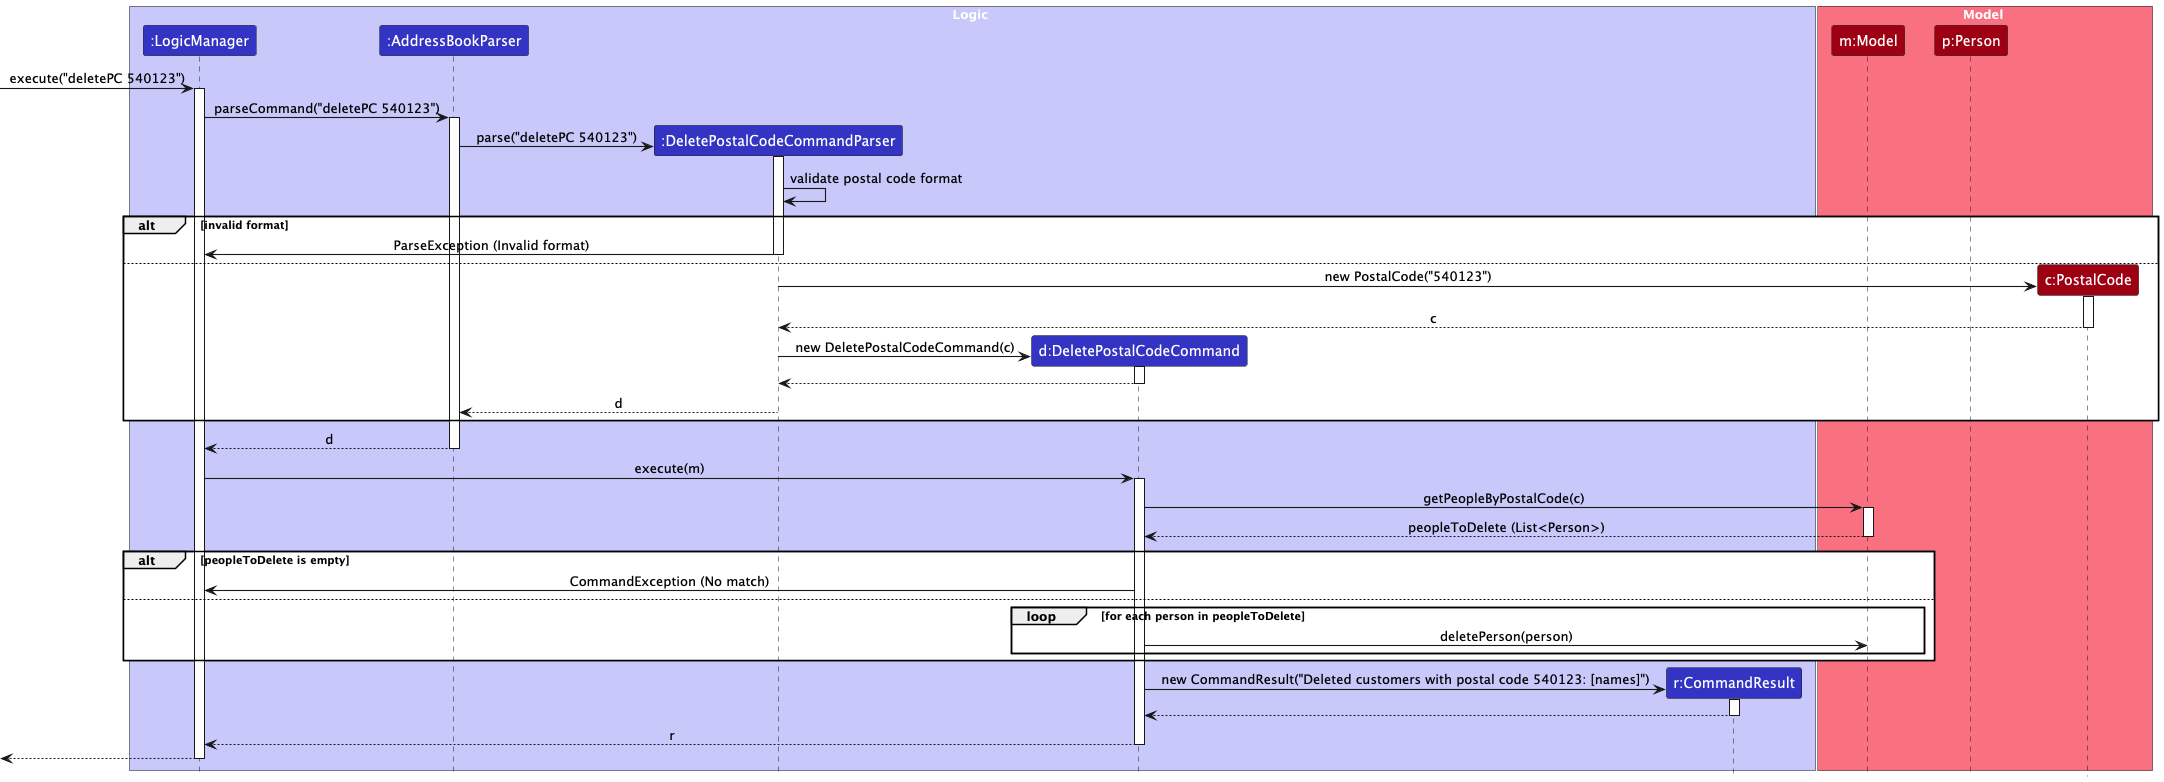
Figure: Delete by Postal Code Command Sequence Diagram
List Shortcut feature
Implementation
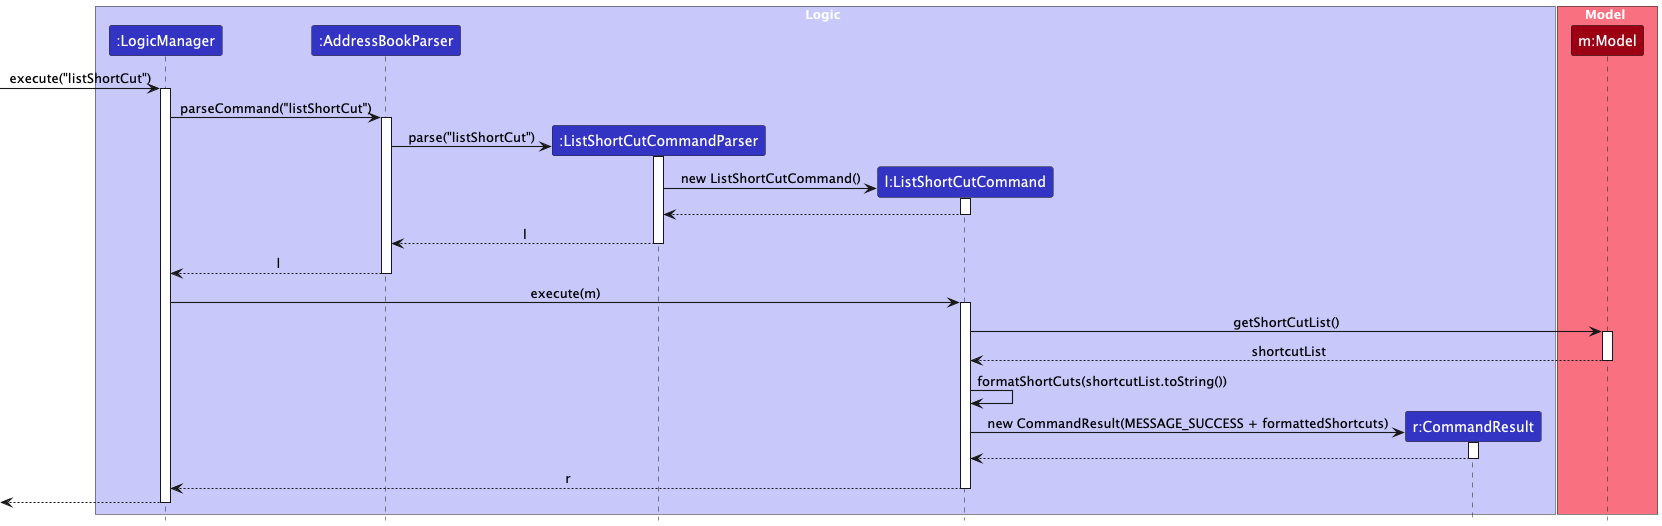
The listShortCut feature allows users to view all existing shortcuts for tags in the address book. This process involves parsing the command input, retrieving the list of shortcuts from the Model, formatting the shortcuts into a readable format, and displaying them to the user.
Below is a step-by-step usage scenario of the listShortCut feature, showing how each component interacts to achieve this functionality.
Step 1: Command Execution by LogicManager:
- The
LogicManagerreceives theexecute("listShortCut")command, initiating the process of listing all tag shortcuts in the address book.
Step 2: Parsing the Command:
-
LogicManagercallsparseCommandonAddressBookParserwith the command string to interpret the input. -
AddressBookParsercreates aListShortCutCommandParserto handle the specifics of parsing thelistShortCutcommand.
Step 3: Creating ListShortCutCommand:
-
ListShortCutCommandParserparses the command, confirming it matches the expected format. - After validating the command, it creates a new
ListShortCutCommandinstance and passes it back toAddressBookParser, which in turn returns it toLogicManager.
Step 4: Executing ListShortCutCommand:
-
LogicManagercalls theexecutemethod ofListShortCutCommand, passing in theModelinstance (m) to access stored shortcuts.
Step 5: Retrieving and Formatting Shortcuts:
-
ListShortCutCommandcallsModel.getShortCutList()to retrieve the current list of shortcuts stored inUniqueShortCutList. - It then formats the shortcuts by calling
formatShortCuts(shortcutList.toString()), which organizes the list into a readable format for the user.
Step 6: Creating and Returning the Result:
- After formatting,
ListShortCutCommandcreates aCommandResultwith the message containing the formatted list of shortcuts (e.g.,"Shortcut Mappings\n<formatted shortcuts>"). - The result is returned to
LogicManager, completing thelistShortCutcommand execution.
Filter feature
Implementation
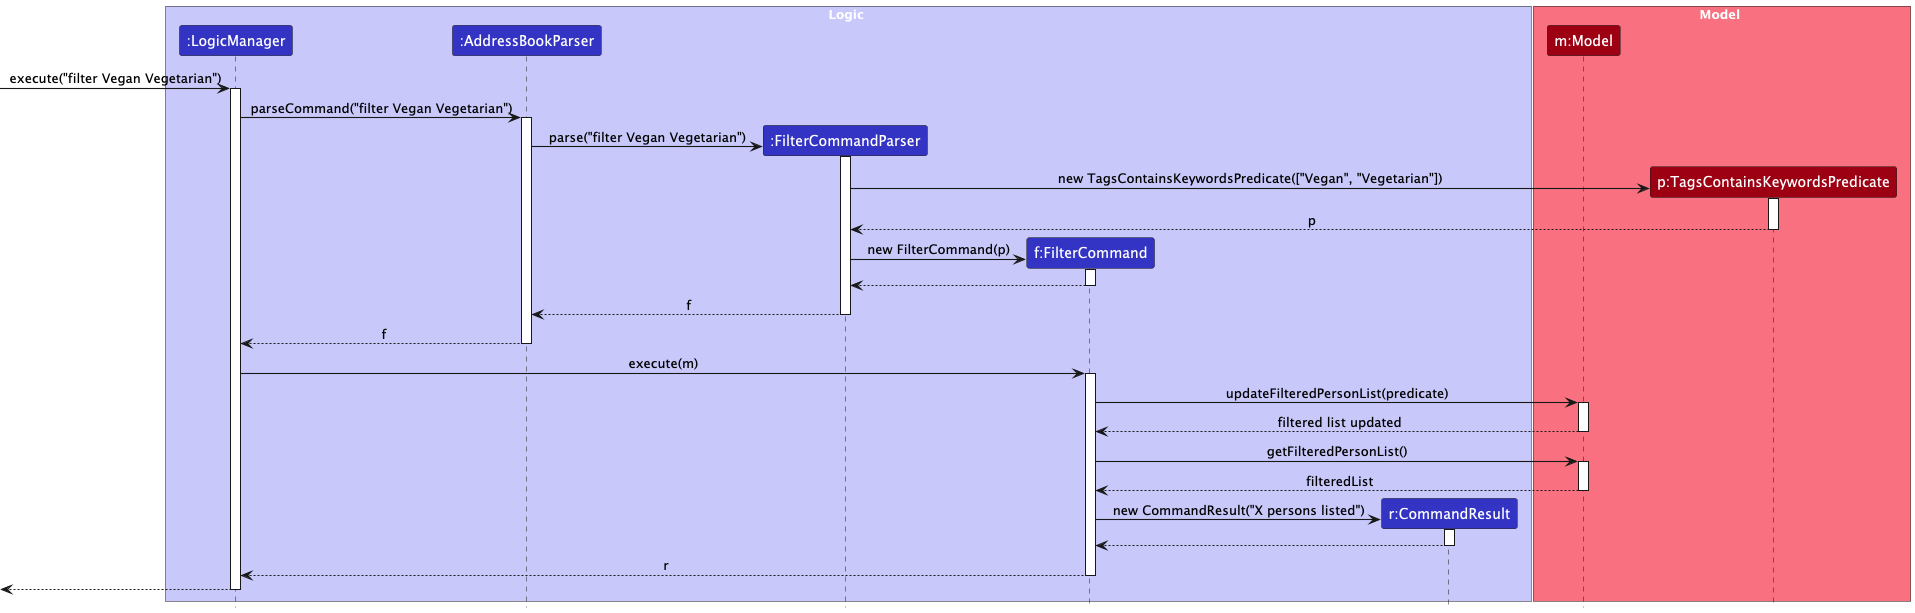
The filter feature enables users to filter the list of persons in the address book based on specific tag keywords. This process involves parsing the command input, generating a predicate for filtering, updating the filtered list in Model, and displaying the results.
Below is a step-by-step usage scenario of the filter feature, showing how each component interacts to achieve this functionality.
Step 1: Command Execution by LogicManager:
- The
LogicManagerreceives theexecute("filter v vg")command, initiating the filtering process wherevandvgrepresent the tag keywords for filtering persons in the address book.
Step 2: Parsing the Command:
-
LogicManagercallsparseCommandonAddressBookParserwith the command string to interpret the input. -
AddressBookParsercreates aFilterCommandParserto handle the specifics of parsing thefiltercommand.
Step 3: Creating TagsContainsKeywordsPredicate:
-
FilterCommandParserextracts the keywords (vandvg) from the command. - It then creates a new
TagsContainsKeywordsPredicateinstance, passing the keywords to this predicate, which is used to filter persons based on tags matching these keywords.
Step 4: Creating FilterCommand:
-
FilterCommandParserthen creates aFilterCommandwith theTagsContainsKeywordsPredicateand passes it back toAddressBookParser, which returns it toLogicManager.
Step 5: Executing FilterCommand:
-
LogicManagercalls theexecutemethod ofFilterCommand, passing in theModelinstance (m) to update the list of persons based on the filter criteria.
Step 6: Updating the Filtered List:
-
FilterCommandcallsModel.updateFilteredPersonList(predicate), which applies theTagsContainsKeywordsPredicateto filter persons by tags. - The
Modelupdates the filtered list of persons and returns confirmation.
Step 7: Retrieving and Displaying the Filtered List:
-
FilterCommandthen callsModel.getFilteredPersonList()to retrieve the updated filtered list of persons matching the keywords. - A
CommandResultis created with a message summarizing the number of persons listed after filtering (e.g.,"X persons listed").
Step 8: Returning the Result:
- The
CommandResultis returned toLogicManager, completing thefiltercommand execution.
This implementation allows users to filter persons by tag keywords, enabling them to quickly locate individuals associated with specific tags. The feature provides feedback on the number of matching persons, enhancing the usability of the address book.
This implementation enables users to quickly view all tag shortcuts, providing a well-organized list of alias-to-tag mappings. The formatting method ensures that the displayed shortcuts are easy to read, enhancing the user experience.
[Proposed] Undo/redo feature
Proposed Implementation
The proposed undo/redo mechanism is facilitated by VersionedAddressBook. It extends AddressBook with an undo/redo history, stored internally as an addressBookStateList and currentStatePointer. Additionally, it implements the following operations:
-
VersionedAddressBook#commit()— Saves the current address book state in its history. -
VersionedAddressBook#undo()— Restores the previous address book state from its history. -
VersionedAddressBook#redo()— Restores a previously undone address book state from its history.
These operations are exposed in the Model interface as Model#commitAddressBook(), Model#undoAddressBook() and Model#redoAddressBook() respectively.
Given below is an example usage scenario and how the undo/redo mechanism behaves at each step.
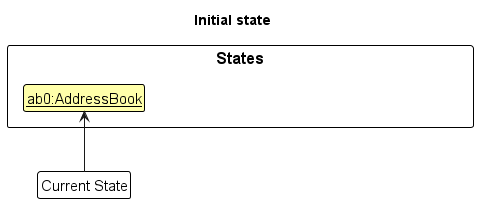
Step 1. The user launches the application for the first time. The VersionedAddressBook will be initialized with the initial address book state, and the currentStatePointer pointing to that single address book state.
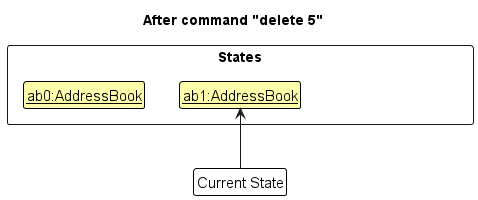
Step 2. The user executes delete 5 command to delete the 5th person in the address book. The delete command calls Model#commitAddressBook(), causing the modified state of the address book after the delete 5 command executes to be saved in the addressBookStateList, and the currentStatePointer is shifted to the newly inserted address book state.
Step 3. The user executes add n/David … to add a new person. The add command also calls Model#commitAddressBook(), causing another modified address book state to be saved into the addressBookStateList.
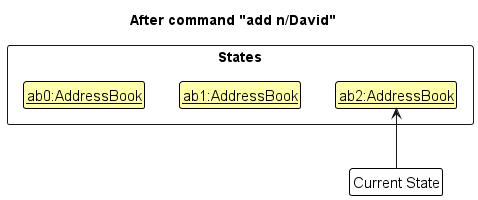
Model#commitAddressBook(), so the address book state will not be saved into the addressBookStateList.
Step 4. The user now decides that adding the person was a mistake, and decides to undo that action by executing the undo command. The undo command will call Model#undoAddressBook(), which will shift the currentStatePointer once to the left, pointing it to the previous address book state, and restores the address book to that state.
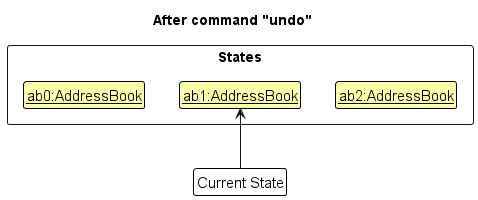
currentStatePointer is at index 0, pointing to the initial AddressBook state, then there are no previous AddressBook states to restore. The undo command uses Model#canUndoAddressBook() to check if this is the case. If so, it will return an error to the user rather
than attempting to perform the undo.
The following sequence diagram shows how an undo operation goes through the Logic component:
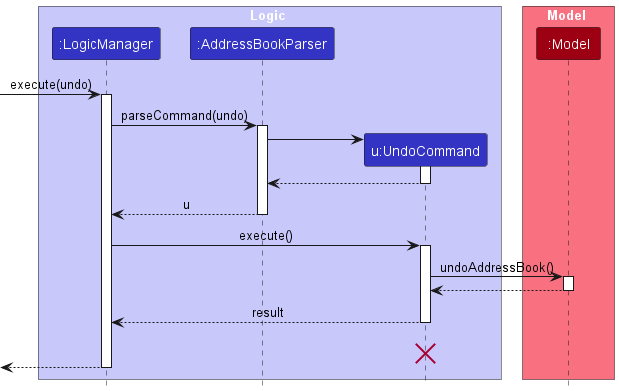
UndoCommand should end at the destroy marker (X) but due to a limitation of PlantUML, the lifeline reaches the end of diagram.
Similarly, how an undo operation goes through the Model component is shown below:
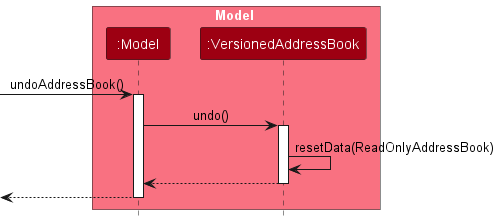
The redo command does the opposite — it calls Model#redoAddressBook(), which shifts the currentStatePointer once to the right, pointing to the previously undone state, and restores the address book to that state.
currentStatePointer is at index addressBookStateList.size() - 1, pointing to the latest address book state, then there are no undone AddressBook states to restore. The redo command uses Model#canRedoAddressBook() to check if this is the case. If so, it will return an error to the user rather than attempting to perform the redo.
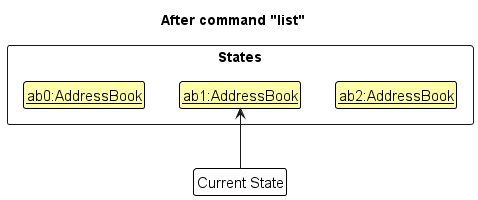
Step 5. The user then decides to execute the command list. Commands that do not modify the address book, such as list, will usually not call Model#commitAddressBook(), Model#undoAddressBook() or Model#redoAddressBook(). Thus, the addressBookStateList remains unchanged.
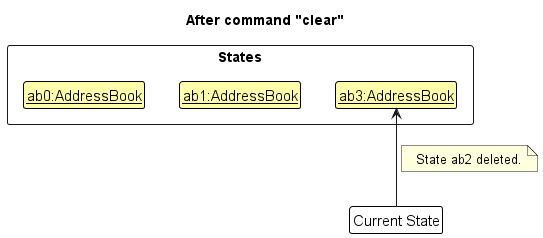
Step 6. The user executes clear, which calls Model#commitAddressBook(). Since the currentStatePointer is not pointing at the end of the addressBookStateList, all address book states after the currentStatePointer will be purged. Reason: It no longer makes sense to redo the add n/David … command. This is the behavior that most modern desktop applications follow.
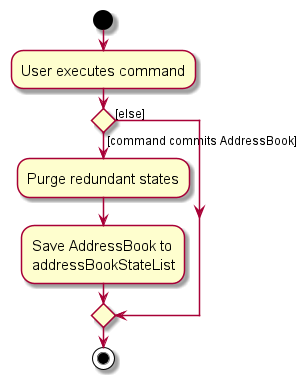
The following activity diagram summarizes what happens when a user executes a new command:
Design considerations:
Aspect: How undo & redo executes:
-
Alternative 1 (current choice): Saves the entire address book.
- Pros: Easy to implement.
- Cons: May have performance issues in terms of memory usage.
-
Alternative 2: Individual command knows how to undo/redo by
itself.
- Pros: Will use less memory (e.g. for
delete, just save the person being deleted). - Cons: We must ensure that the implementation of each individual command are correct.
- Pros: Will use less memory (e.g. for
Documentation, logging, testing, configuration, dev-ops
Appendix: Requirements
Product scope
Target user profile:
- Managers of smaller eateries/restaurants who need to maintain organised customer details for delivery purposes.
- prefer desktop apps over other types
- can type fast
- prefers typing to mouse interactions
Value proposition: For restaurants to efficiently and accurately manage customer contact and information
User stories
Priorities: High (must have) - * * *, Medium (nice to have) - * *, Low (unlikely to have) - *
| Priority | As a … | I want to … | So that I can… |
|---|---|---|---|
* * * |
manager | add a customer’s detail via a one-line CLI command | quickly add new customers without >1 step |
* * * |
manager | retrieve a customer’s detail via a one-line CLI command | view their details without having to scroll through pages |
* * * |
manager | delete customer data in one-line CLI | delete customers that I want to not deliver to anymore |
* * * |
manager | search for customers by name | quickly access customer profiles during phone orders |
* * * |
manager | search for customers by phone number | quickly access customer profiles during phone orders |
* * |
manager | edit customer data in one-line CLI | update any part of user data in 1 step |
* * |
manager | bulk-create multiple customers through a file | quickly populate the system |
* * |
manager | bulk update multiple customers | effectively manage large sets of customers |
* * |
manager | assign tags to customers easily by setting abbreviations to tagnames | not waste time typing out tag names that are already predetermined |
* * |
manager | be able to see order history of a customer | apply targeted advertising |
* * |
manager | be able to see order frequency of a customer | prepare suitable amount of ingredient beforehand |
* |
manager | add order to the application | track what is being served at the restaurant |
* |
manager | archive customer data instead of a hard delete | avoid losing this information permanently |
* |
manager | unarchive a customer | continue serving this customer |
* |
manager | list customers by recent order dates | quickly identify who is a repeat customer |
* |
manager | list customers by order frequency | identify regular customers for reward programmes |
* |
manager | export customer data as a CSV | provide the data to other people to use |
* |
manager | convert a CSV file into a readable state file | have a backup |
* |
manager | export CSV data using specific criteria | reduce the effort needed by others to parse the data |
* |
manager | validate attributes when adding a customer | avoid entering invalid data |
* |
manager | validate attributes when updating a customer | avoid entering invalid data |
* |
manager | categorise customers as VIP, regular, or new | know who to target for promotions |
* |
manager | tag customers with dietary restrictions | personalise orders and maintain customer service |
* |
manager | create a tag | tag customers with a different issue |
* |
manager | tag customers with multiple different tags | store a pattern of customers |
* |
manager | bulk tag customers with dietary restrictions | save time |
* |
manager | group customers by tag | easily find and manage customers for promotions |
Use cases
(For all use cases below, the System is the NomNomNotifier and the Actor is the manager, unless specified otherwise)
Use case: Add a customer
MSS
- Manager requests to add customer
- NomNomNotifier adds the person
- Use Case Ends
Extension
- 1a. Manager request/invalid/incomplete
- 1a1. NomNomNotifier shows an error message
- Use Case Ends
- 1b. Manager tags customer using pre-assigned shortcut
- 1b1. Abbreviation is mapped to pre-assigned tag name
- Use Case resumes at step 2
Use case: Edit for a customer
MSS
- Manager requests to list the customers
- NomNomNotifier shows a list of customers
- Manager requests to edit customer details at a given index
- NomNomNotifier changes the customer detail accordingly
- Use Case Ends
Extension
- 2a. List is empty
- Use Case Ends
- 3a. Manager request does not adhere to field’s restrictions
- 3a1. NomNomNotifier shows an error message
- Use Case resumes at 3
- 3b. Manager tags customers using pre-assigned shortcut
- 3b1. Abbreviation is mapped to pre-assigned tag name
- Use Case resumes at step 4
Use case: Search for a customer
MSS
- Manager requests to list the customers
- NomNomNotifier shows a list of customers
- Manager requests to search for customer by name/phone number
- NomNomNotifier shows the customer
- Use Case Ends
Extension
- 2a. The list is empty
- User Case Ends
- 3a. Manager request/invalid/incomplete
- 3a1. NomNomNotifier shows an error message.
- Use Case Ends
Use case: Delete a person
MSS
- Manager requests to list customers
- NomNomNotifier shows a list of customers
- Manager requests to delete a specific customers in the list
- NomNomNotifier deletes the customers
- Use case ends
Extensions
- 2a. The list is empty.
- Use case ends.
- 3a. The given index is invalid.
- 3a1. NomNomNotifier shows an error message.
- Use case resumes at step 2.
Use Case: Creating a shortcut
MSS
- Manager requests to add shortcut
- NomNomNotifier adds the shortcut with alias and tag name
- Use Case ends
Extension
- 1a. Shortcut format is invalid
- 1a1. NomNomNotifier shows error message
- Use Case ends
- 1b. Alias or tag name in shortcut already exists in NomNomNotifier
- 1b1. NomNomNotifier shows error message
- Use Case ends
Use Case: Deleting a shortcut
MSS
- Manager requests to delete shortcut
- NomNomNotifier deletes the shortcut with specified alias and tag name
- Use Case ends
Extension
- 1a. Shortcut format is invalid
- 1a1. NomNomNotifier shows error message
- Use Case ends
- 1b. ShortCut with same alias and tag name does not exist in NomNomNotifier
- 1b1. NomNomNotifier shows error message
- Use Case ends
Use Case: Adding an order to the application
MSS
- Manager requests to add an order
- NomNomNotifier add the order to UniqueOrderList in with the specified order name
- Use Case ends
Extension
- 1a. Order format is invalid
- 1a1. NomNomNotifier shows error message
- Use Case ends
- 1b. Order already exist in NomNomNotifier
- 1b1. NomNomNotifier shows error message
- Use Case ends
Use Case: Deleting an order from the application
MSS
- Manager requests to delete an order
- NomNomNotifier delete the order with the specified order name from the UniqueOrderList
- Use Case ends
Extension
- 1a. Order format is invalid
- 1a1. NomNomNotifier shows error message
- Use Case ends
- 1b. Order does not exist in NomNomNotifier
- 1b1. NomNomNotifier shows error message
- Use Case ends
Use Case: Viewing all order(s) stored in the application
MSS
- Manager requests to view all order(s)
- NomNomNotifier shows all order(s) stored in the UniqueOrderList
- Use Case ends
Use Case: Viewing the order history of a customer
MSS
- Manager requests to view order history of a customer
- NomNomNotifier attempts to get the order history associated with the customer
- NomNomNotifier display the order history of the customer
- Use Case ends
Extension
- 2a. Customer not found
- 2a1. NomNomNotifier shows error message
- Use Case ends
Planned Enhancements
Team Size: 5
-
Enforce Case-Insensitivity for Tags to Promote Consistency
The current behavior for tag handling creates a discrepancy between shortcut creation (case-insensitive) and tag usage (
t/command is case-sensitive), which can lead to user confusion. We plan to align the behavior for consistency and improve user experience. We plan to make tags case-insensitive to promote consistency between shortcut handling and custom tagging. -
Enforce Prefix Usage (
t/) on Filter Command:The current behaviour regarding the filter feature, involves the multiple keywords being parsed into
TagsContainKeywordPredicatewhich uses thecontainmethod against all current tags and filtering the people based on the keywords. As Tag Names are allowed to have spaces, possible tags could be “No Pork” and “Pork Lover”. When using the filter feature for “Pork Lover” as input, the result would show people containing both tags as both contain the keyword: “Pork”. This may limit the effectiveness of this feature. As such, we plan to use prefixt/within the filter command so that the entire keyword “Pork Lover” can be parsed, with relevant customer details being listed. -
Enhance the unique identifier of a
Personto be both name and phone numberThe current behaviour includes the unique identifier of a Person to the name attribute. However, we acknowledge that people can have the same name. As such, this enhancement would entail the name and phone number to be unique identifier for a
Person. We understand that this may interfere with order put command. This would also entail the inclusion of a phone number field when using theputcommand. -
Being able to edit/delete order history of a customer
Add
editHistoryanddeleteHistorycommand that allows order history of a customer to be modified, to enhance flexibility of the application. To do that, we can addeditHistory/deleteHistorymethod insideOrderTracker, and call it from theexecuteineditHistory/deleteHistory. -
Being able to export customer order history into csv file
Add
downloadOrderHistorycommand to export all customer data alongside the order history, so that the manager can mass process all the customer data for other purpose such as targeted advertising using machine learning -
Add support for reading long command
Currently, the application may crash if the user inputs a very large string into the text box, as the entire content is loaded into memory at once. This can cause issues with memory management and lead to application instability or crashes, especially for files or inputs with significant text content. To prevent crashes and improve performance, we plan to implement a buffered reading approach using Java’s BufferedReader to handle large text inputs in manageable chunks
Non-Functional Requirements
- Should work on any mainstream OS as long as it has Java
17or above installed. - Command Response Time: All operations (add, delete, search) should respond within 1 second
- Bulk Operations: Bulk actions (e.g., adding multiple customers) should handle up to 100 records and complete within 2 seconds
- A user with above average typing speed for regular English text (i.e. not code, not system admin commands) should be able to accomplish most of the tasks faster using commands than using the mouse.
- Error Handling: Meaningful error messages should be provided for invalid inputs (e.g., invalid email or phone number).
- Command Documentation: Provide help text for each command and clear usage instructions.
Glossary
- Mainstream OS: Windows, Linux, Unix, MacOS
- Private contact detail: A contact detail that is not meant to be shared with others
- CLI (Command-Line Interface): A text-based interface where users can type commands to interact with the system
- Customer: An individual whose details (e.g., name, phone number, email) are stored in the system for tracking purposes
- Tag: A label or keyword that can be associated with a customer to categorize or describe them (e.g., “vegetarian”, “loyalty-programme”)
- Parameter: Information provided by the user as part of a command, such as name, email, or phone number
- CSV (Comma-Separated Values): A common format for storing and exchanging tabular data, where each row represents a record, and each field is separated by a comma
Appendix: Instructions for manual testing
Given below are instructions to test the app manually.
Launch and shutdown
-
Initial launch
-
Download the jar file and copy into an empty folder
-
cd into that empty folder and run the command :
java -jar NomNomNotifier.jarExpected: Shows the GUI with a set of sample contacts. The window size may not be optimum.
-
-
Saving window preferences
-
Resize the window to an optimum size. Move the window to a different location. Close the window.
-
Re-launch the app by running the command:
java -jar NomNomNotifier.jar.
Expected: The most recent window size and location is retained.
-
Deleting a person
-
Deleting a person while all persons are being shown
-
Prerequisites: List all persons using the
listcommand. Multiple persons in the list. -
Test case:
delete 1
Expected: First contact is deleted from the list. Details of the deleted contact shown in the status message. Timestamp in the status bar is updated. -
Test case:
delete 0
Expected: No person is deleted. Error details shown in the status message. Status bar remains the same. -
Other incorrect delete commands to try:
delete,delete x,...(where x is larger than the list size)
Expected: Similar to previous.
-
Saving data
-
Dealing with corrupted data files
- Within the same directory of NomNomNotifier.jar, if the data file with
addressbook.jsonis corrupted (eg. input restrictions for fields is breached), the next time NomNomNotifier is relaunched, an empty list will be displayed on the GUI. - If customers are added to that empty list, changes made to the empty list will overwrite the corrupted
addressbook.jsonfile
- Within the same directory of NomNomNotifier.jar, if the data file with
-
Dealing with missing data file
- Within the same directory of NomNomNotifier.jar, if the data file with
addressbook.jsonis missing or deleted, the next time NomNomNotifier is relaunched, a sample list of customers will be showned. - When new data is stored or existing data is changed through existing commands (eg. add, edit, add shortcut, add order), a new
addressbook.jsonfile will be created
- Within the same directory of NomNomNotifier.jar, if the data file with